搜索到
76
篇与
Kornan
的结果
-
 Caused by: android.view.InflateException: Binary XML file line #258: Error inflating class android.webkit.WebView 看到有部分机型出现了BUG,并有用户也反馈了升级后某页面无法打开:Caused by: android.view.InflateException: Binary XML file line #258: Error inflating class android.webkit.WebView回想一下新版本做的改动,有问题的页面也就是调整了下布局,而用了WebView的地方也只有Admob广告而已,这里并没有改动,Google了一会儿,原来罪魁祸首的是appcompat,旧版本用的是appcompat1.0.2,新版本用的是appcompat:1.1.0。具体原因不明,改回1.0.2后测试正常,用新的androidx.appcompat:appcompat:1.2.0-alpha03也没问题。解决方案:https://stackoverflow.com/questions/41025200/android-view-inflateexception-error-inflating-class-android-webkit-webview
 -

-
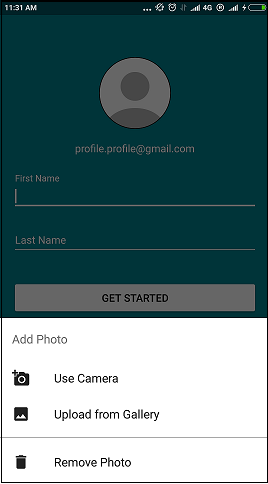
 使用BottomSheetDialogFragment底部弹框 步骤1:为底页创建布局文件<LinearLayout xmlns:android="http://schemas.android.com/apk/res/android" android:layout_width="match_parent" android:layout_height="wrap_content" android:layout_marginBottom="@dimen/dp_8" android:layout_marginTop="@dimen/dp_8" android:orientation="vertical"> <TextView android:id="@+id/tv_bottom_sheet_heading" android:layout_width="wrap_content" android:layout_height="@dimen/dp_56" android:layout_marginEnd="@dimen/dp_16" android:layout_marginStart="@dimen/dp_16" android:gravity="center" android:text="@string/bottom_sheet_option_heading" android:textColor="@color/md_bottom_sheet_title_color" android:textSize="16sp" /> <TextView android:id="@+id/tv_btn_add_photo_camera" android:layout_width="match_parent" android:layout_height="@dimen/dp_48" android:layout_marginEnd="@dimen/dp_16" android:layout_marginStart="@dimen/dp_16" android:backgroundTint="@android:color/white" android:drawablePadding="@dimen/dp_32" android:drawableStart="@drawable/ic_add_a_photo" android:drawableTint="@color/md_bottom_sheet_text_color" android:gravity="start|center_vertical" android:text="@string/bottom_sheet_option_camera" android:textColor="@color/md_bottom_sheet_text_color" android:textSize="16sp" /> <TextView android:id="@+id/tv_btn_add_photo_gallery" android:layout_width="match_parent" android:layout_height="48dp" android:layout_marginEnd="@dimen/dp_16" android:layout_marginStart="@dimen/dp_16" android:backgroundTint="@android:color/white" android:drawablePadding="@dimen/dp_32" android:drawableStart="@drawable/ic_gallery_photo" android:drawableTint="@color/md_bottom_sheet_text_color" android:gravity="start|center_vertical" android:text="@string/bottom_sheet_option_gallery" android:textColor="@color/md_bottom_sheet_text_color" android:textSize="16sp" /> <View android:layout_width="match_parent" android:layout_height="1dp" android:layout_marginBottom="@dimen/dp_8" android:layout_marginTop="@dimen/md_bottom_sheet_separator_top_margin" android:background="@color/grayTextColor" /> <TextView android:id="@+id/tv_btn_remove_photo" android:layout_width="match_parent" android:layout_height="@dimen/dp_48" android:layout_marginEnd="@dimen/dp_16" android:layout_marginStart="@dimen/dp_16" android:backgroundTint="@android:color/white" android:drawablePadding="@dimen/dp_32" android:drawableStart="@drawable/ic_delete_photo" android:drawableTint="@color/md_bottom_sheet_text_color" android:gravity="start|center_vertical" android:text="@string/bottom_sheet_option_remove_photo" android:textColor="@color/md_bottom_sheet_text_color" android:textSize="16sp" /> </LinearLayout>步骤2:创建dimen.xml文件:<?xml version="1.0" encoding="utf-8"?> <resources> <dimen name="dp_8">8dp</dimen> <dimen name="dp_16">16dp</dimen> <dimen name="dp_24">24dp</dimen> <dimen name="dp_32">32dp</dimen> <dimen name="dp_40">40dp</dimen> <dimen name="dp_48">48dp</dimen> <dimen name="dp_56">56dp</dimen> <dimen name="dp_64">64dp</dimen> <dimen name="dp_72">72dp</dimen> <dimen name="dp_80">80dp</dimen> <dimen name="dp_160">160dp</dimen> <dimen name="md_bottom_sheet_separator_top_margin">7dp</dimen> </resources>步骤3:string.xml文件:<string name="bottom_sheet_option_camera">Use Camera</string> <string name="bottom_sheet_option_gallery">Upload from Gallery</string> <string name="bottom_sheet_option_heading">Add Photo</string> <string name="bottom_sheet_option_remove_photo">Remove Photo</string>步骤4:创建自定义BottomSheetDialogFragmentpublic class AddPhotoBottomDialogFragment extends BottomSheetDialogFragment{ public static AddPhotoBottomDialogFragment newInstance() { return new AddPhotoBottomDialogFragment(); } @Nullable @Override public View onCreateView(LayoutInflater inflater, @Nullable ViewGroup container, @Nullable Bundle savedInstanceState) { View view = inflater.inflate(R.layout.layout_photo_bottom_sheet, container, false); // get the views and attach the listener return view; } }步骤5:在Activity中弹出FragmentDialog:AddPhotoBottomDialogFragment addPhotoBottomDialogFragment = AddPhotoBottomDialogFragment.newInstance(); addPhotoBottomDialogFragment.show(getSupportFragmentManager(), "add_photo_dialog_fragment");就这样完成了:您可以在自定义底部工作表对话框片段中创建自定义回调接口,以在单击底部的按钮时通知Activity
 -
 Android P http网络请求失败 最近更新了android studio,以及到gradle和android sdk版本 ;手机Pixel 2 xl,系统Android P;网络请求okhttp3,每次网络请求总是:java.net.UnknownServiceException: CLEARTEXT communication ** not permitted by network security policy官网文档:Android致力于保护用户,他们的设备和数据安全。我们保证数据安全的方法之一是保护所有进入或离开Android设备的数据在传输中使用传输层安全性(TLS)。正如我们在Android P开发人员预览中所宣布的那样,我们通过阻止针对Android P的应用程序默认允许未加密的连接来进一步改进这些保护。这是我们多年来为更好地保护Android用户而做出的各种更改。为了防止意外的未加密连接,我们android:usesCleartextTraffic在Android Marshmallow中引入了manifest属性。在Android Nougat中,我们通过创建Network Security Config功能扩展了该属性,该功能允许应用程序指示他们不打算在没有加密的情况下发送网络流量。在Android Nougat和Oreo中,我们仍然允许明文连接。看来以后都要用https了,在Android P系统的设备上,如果应用使用的是非加密的明文流量的http网络请求,则会导致该应用无法进行网络请求,https则不会受影响,同样地,如果应用嵌套了webview,webview也只能使用https请求。目前找到的解决办法:1:改用https2:targetSdkVersion改为27以下3:在res的xml目录下,新建一个xml文件(名称自定义,如:network_security_config.xml),内容如下:<?xml version="1.0" encoding="utf-8"?> <network-security-config> <base-config cleartextTrafficPermitted="true" /> </network-security-config><application ... android:networkSecurityConfig="@xml/network_security_config" ... />更多参考:https://android-developers.googleblog.com/2018/04/protecting-users-with-tls-by-default-in.html原文:https://www.jianshu.com/p/fb7374b544aa
 -
 设置max_connections无效 在/etc/mysql/my.cnf中设置max_connections=512进入Mysql查看发现还是214mysql> show global variables like '%max_connecti%'; +-----------------+-------+ | Variable_name | Value | +-----------------+-------+ | max_connections | 214 | +-----------------+-------+ 1 row in set (0.01 sec)google了一番后,说是跟open_files_limit有关,每个connect都会打开几个文件,查了下open_files_limit为1024。mysql> show global variables like '%open_files_limit%'; +------------------+-------+ | Variable_name | Value | +------------------+-------+ | open_files_limit | 1024 | +------------------+-------+ 1 row in set (0.00 sec)在/etc/mysql/my.cnf中加上open_files_limit = 4096重启mysql后查看mysql> show global variables like '%max_connecti%'; +-----------------+-------+ | Variable_name | Value | +-----------------+-------+ | max_connections | 512 | +-----------------+-------+ 1 row in set (0.01 sec)mysql> show global variables like '%open_files_limit%'; +------------------+-------+ | Variable_name | Value | +------------------+-------+ | open_files_limit | 4096 | +------------------+-------+ 1 row in set (0.00 sec)open_files_limit最大值也是有限制的,设置太大也会变成默认1024,可以在/etc/security/limits.conf加上并重启系统* soft nofile 65536 * hard nofile 65536还有就是启动mysql的service加上LimitNOFILE=65535并重启mysql,这样可以解除open file的限制,LimitNOFILE=65535
 -


