搜索到
75
篇与
默认分类
的结果
-
 CENTOS 7 YUM 安装PHP7.4 安装源yum install epel-release yum install http://rpms.remirepo.net/enterprise/remi-release-7.rpm安装YUM管理工具yum install yum-utils搜索yum search php74安装PHPyum install php74-php-gd php74-php-pdo php74-php-mbstring php74-php-cli php74-php-fpm php74-php-mysqlnd启动service php74-php-fpm start
 -

-

-
 pem私钥登录 SSH 在本地生成公钥私钥ssh-keygen将公钥传到服务器上ssh-copy-id -i ~/.ssh/id_rsa.pub remote-host会提示你输入密码,成功之后,会帮助你把公钥放在服务器上,供登录使用把本地的私钥转为pem格式openssl rsa -in ~/.ssh/id_rsa -outform pem > id_rsa.pem chmod 600 id_rsa.pem这样就导出了pem格式的私钥,因为公钥已经在服务器了,所以只要服务器上的公钥不删除,用这把私钥就能登录服务器,一般来说,经过这样设置之后,可以把ssh 密码登录的方式禁用掉,使得服务器更加安全。关闭ssh密码登录vi /etc/ssh/sshd_config ... PasswordAuthentication no重启SSH服务systemctl restart sshdpem登录ssh -i id_rsa.pem root@your_server_ipThe end!
 -
 显示PopupMenu时滚动toolbar 我在Fragment里弹PopupMenu时会把toolbar向上滚动<android.support.design.widget.CoordinatorLayout xmlns:android="http://schemas.android.com/apk/res/android" xmlns:app="http://schemas.android.com/apk/res-auto" android:layout_width="match_parent" android:layout_height="match_parent" android:fitsSystemWindows="true" android:id="@+id/coordinatorLayout"> <android.support.design.widget.AppBarLayout android:layout_width="match_parent" android:layout_height="wrap_content" android:theme="@style/ThemeOverlay.AppCompat.Dark.ActionBar"> <android.support.v7.widget.Toolbar android:id="@+id/toolbar" android:layout_width="match_parent" android:layout_height="?attr/actionBarSize" android:background="?attr/colorPrimary" app:layout_scrollFlags="scroll|enterAlways" app:popupTheme="@style/ThemeOverlay.AppCompat.Light" /> <android.support.design.widget.TabLayout android:id="@+id/tabs" android:layout_width="match_parent" android:layout_height="wrap_content" app:tabMode="fixed" app:tabGravity="fill"/> </android.support.design.widget.AppBarLayout> <android.support.v4.view.ViewPager android:id="@+id/viewpager" android:layout_width="match_parent" android:layout_height="match_parent" app:layout_behavior="@string/appbar_scrolling_view_behavior" /> <android.support.design.widget.FloatingActionButton android:id="@+id/floatingButton" android:layout_width="wrap_content" android:layout_height="wrap_content" android:layout_gravity="bottom|end" android:layout_margin="@dimen/fab_margin" android:src="@drawable/ic_add" /> </android.support.design.widget.CoordinatorLayout>解决办法:PopupMenu popupMenu = new PopupMenu(MainActivity.this,view);替换成PopupMenu popupMenu = new PopupMenu(MainActivity.this,view, Gravity.RIGHT);
 -
 Caused by: android.view.InflateException: Binary XML file line #258: Error inflating class android.webkit.WebView 看到有部分机型出现了BUG,并有用户也反馈了升级后某页面无法打开:Caused by: android.view.InflateException: Binary XML file line #258: Error inflating class android.webkit.WebView回想一下新版本做的改动,有问题的页面也就是调整了下布局,而用了WebView的地方也只有Admob广告而已,这里并没有改动,Google了一会儿,原来罪魁祸首的是appcompat,旧版本用的是appcompat1.0.2,新版本用的是appcompat:1.1.0。具体原因不明,改回1.0.2后测试正常,用新的androidx.appcompat:appcompat:1.2.0-alpha03也没问题。解决方案:https://stackoverflow.com/questions/41025200/android-view-inflateexception-error-inflating-class-android-webkit-webview
 -

-
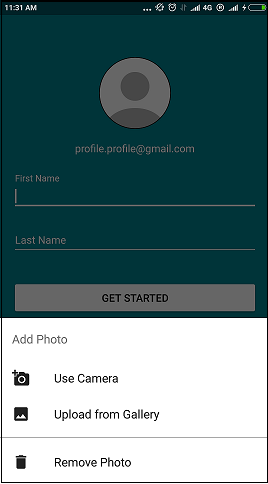
 使用BottomSheetDialogFragment底部弹框 步骤1:为底页创建布局文件<LinearLayout xmlns:android="http://schemas.android.com/apk/res/android" android:layout_width="match_parent" android:layout_height="wrap_content" android:layout_marginBottom="@dimen/dp_8" android:layout_marginTop="@dimen/dp_8" android:orientation="vertical"> <TextView android:id="@+id/tv_bottom_sheet_heading" android:layout_width="wrap_content" android:layout_height="@dimen/dp_56" android:layout_marginEnd="@dimen/dp_16" android:layout_marginStart="@dimen/dp_16" android:gravity="center" android:text="@string/bottom_sheet_option_heading" android:textColor="@color/md_bottom_sheet_title_color" android:textSize="16sp" /> <TextView android:id="@+id/tv_btn_add_photo_camera" android:layout_width="match_parent" android:layout_height="@dimen/dp_48" android:layout_marginEnd="@dimen/dp_16" android:layout_marginStart="@dimen/dp_16" android:backgroundTint="@android:color/white" android:drawablePadding="@dimen/dp_32" android:drawableStart="@drawable/ic_add_a_photo" android:drawableTint="@color/md_bottom_sheet_text_color" android:gravity="start|center_vertical" android:text="@string/bottom_sheet_option_camera" android:textColor="@color/md_bottom_sheet_text_color" android:textSize="16sp" /> <TextView android:id="@+id/tv_btn_add_photo_gallery" android:layout_width="match_parent" android:layout_height="48dp" android:layout_marginEnd="@dimen/dp_16" android:layout_marginStart="@dimen/dp_16" android:backgroundTint="@android:color/white" android:drawablePadding="@dimen/dp_32" android:drawableStart="@drawable/ic_gallery_photo" android:drawableTint="@color/md_bottom_sheet_text_color" android:gravity="start|center_vertical" android:text="@string/bottom_sheet_option_gallery" android:textColor="@color/md_bottom_sheet_text_color" android:textSize="16sp" /> <View android:layout_width="match_parent" android:layout_height="1dp" android:layout_marginBottom="@dimen/dp_8" android:layout_marginTop="@dimen/md_bottom_sheet_separator_top_margin" android:background="@color/grayTextColor" /> <TextView android:id="@+id/tv_btn_remove_photo" android:layout_width="match_parent" android:layout_height="@dimen/dp_48" android:layout_marginEnd="@dimen/dp_16" android:layout_marginStart="@dimen/dp_16" android:backgroundTint="@android:color/white" android:drawablePadding="@dimen/dp_32" android:drawableStart="@drawable/ic_delete_photo" android:drawableTint="@color/md_bottom_sheet_text_color" android:gravity="start|center_vertical" android:text="@string/bottom_sheet_option_remove_photo" android:textColor="@color/md_bottom_sheet_text_color" android:textSize="16sp" /> </LinearLayout>步骤2:创建dimen.xml文件:<?xml version="1.0" encoding="utf-8"?> <resources> <dimen name="dp_8">8dp</dimen> <dimen name="dp_16">16dp</dimen> <dimen name="dp_24">24dp</dimen> <dimen name="dp_32">32dp</dimen> <dimen name="dp_40">40dp</dimen> <dimen name="dp_48">48dp</dimen> <dimen name="dp_56">56dp</dimen> <dimen name="dp_64">64dp</dimen> <dimen name="dp_72">72dp</dimen> <dimen name="dp_80">80dp</dimen> <dimen name="dp_160">160dp</dimen> <dimen name="md_bottom_sheet_separator_top_margin">7dp</dimen> </resources>步骤3:string.xml文件:<string name="bottom_sheet_option_camera">Use Camera</string> <string name="bottom_sheet_option_gallery">Upload from Gallery</string> <string name="bottom_sheet_option_heading">Add Photo</string> <string name="bottom_sheet_option_remove_photo">Remove Photo</string>步骤4:创建自定义BottomSheetDialogFragmentpublic class AddPhotoBottomDialogFragment extends BottomSheetDialogFragment{ public static AddPhotoBottomDialogFragment newInstance() { return new AddPhotoBottomDialogFragment(); } @Nullable @Override public View onCreateView(LayoutInflater inflater, @Nullable ViewGroup container, @Nullable Bundle savedInstanceState) { View view = inflater.inflate(R.layout.layout_photo_bottom_sheet, container, false); // get the views and attach the listener return view; } }步骤5:在Activity中弹出FragmentDialog:AddPhotoBottomDialogFragment addPhotoBottomDialogFragment = AddPhotoBottomDialogFragment.newInstance(); addPhotoBottomDialogFragment.show(getSupportFragmentManager(), "add_photo_dialog_fragment");就这样完成了:您可以在自定义底部工作表对话框片段中创建自定义回调接口,以在单击底部的按钮时通知Activity
 -
 深入理解Looper 先看一个Looper使用范例:class LooperThread extends Thread{ public Handler mHandler; public void run(){ Looper.prepare(); mHandler = new Handler(){ public void handleMessage(Message msg){ //处理消息 } }; Looper.loop();//进入主循环 } }这段代码有三个步骤:1.Looper的准备工作(prepare)2.创建handler3.Looper开始动行(loop)这里会有些疑问,Looper的对象是怎么创建的;handler是如何把message传给MessageQueue的。查看Looper代码,里面有个非常重要的成员变量static final ThreadLocal<Looper> sThreadLocal = new ThreadLocal<Looper>();这是一个静态常量,一旦import了Looper,sThreadLocal就会构建完毕。ThreadLocal对象是一种特殊的全局变量,因为它的“全局”性只限于自己所在的线程,而外界所有线程无法访问它,这也说明了每个线程的Looper都是独立的。在Looper.prepare中sThreadLocal会创建一个Looper对象。private static void prepare(boolean quitAllowed){ if(sThreadLocal.get() != null){ throw new RuntimeException("Only one Looper may be created per thread"); } sThreadLocal.set(new Looper(quitAllowed)); }接下来创建一个Handler对象public Handler mHandler; mHandler = new Handler(){ public void handleMessage(Message msg){ ... } };handler根据构造函数跟Looper关联起来的,比如:public Handler(); public Handler(Callback callback); public Handler(Looper looper); public Handler(Looper looper,Callback callback);这里来看下第一个构造函数public Handler(){ ...//省略部分代码 mLooper = Looper.myLooper();//还是通过sThreadLocal.get来获取当前线程中的Looper实例 ... mQueue = mLooper.mQueue;//mQueue是Looper与Handler之间沟通的桥梁 mCallback = null; } 这样Handler和Looper,MessageQueue就联系起来了,后续handler执行Post/Send两个类型的函数时,会将消息传递到mQueue中,一旦Looper处理到这一消息,它又会从中调用Handler来进行处理。
 -
 Handler是如何传递消息的 先认识下跟Handler有关的几个类:MessageQueue,Message,Runnable,Looper。Runnable和Message可以被传入某个MessageQueue中;Looper不断地从MessageQueue中取出Object然后传给Handler进行处理,依次循环,如果队列为空,就会进入休眠;Handler利用自身的处理机制对传入的Object进行相应的处理。认识这几个类后,再了解下Handler和Thread的关系一个Thread对应一个Looper;一个Looper对应一个MessageQueue;一个MessageQueue对应N个Message;一个Message中对应一个Handle来处理事件;由此可以看出,Thread和Handler是一对多的关系;而Handler主要有两个功能,处理message和将message传入MessageQueue中。Looper从MessageQueue中取出一个Message后,首先会调用Handler.dispatchMessage进行消息分发,默认情况下Handler的分发流程是:Message.callback(Runnable obj) 如果不为空会优先调用callback处理Handler.mCallback 如果不为空会调用mCallback.handleMessage如果以上两个对象都不存在,则会调用Handler.handleMessage如果项目中有需要改变handler的默认行为,可以重载dispatchMessage或handleMessage。Handler发送消息有两种方式,分别是post和send,这两种方式都是负责将message传入MessageQueue,区别在于send处理的参数直接是message,而post需要先把其它信息转换成message,再调用send来执行下一步,看源码:public final boolean post(Runnable r){ return sendMessageDelayed(getPostMessage(r),0); }因为调用时会传一个Runnable对象,post需要先将其封装成一个Message,接着通过对应的send把它传到MessageQueue里。private static Message getPostMessage(Runnable r){ Message m=Message.obtain();//Android系统会维护一个全局的Message池,当用户需要使用Message时,可以调和obtain获得,不用去自行创建,这样可以避免不必要的资源浪费 m.callback=r;//将Runnable对象设置为Message的回调函数 return m; }拿到Message后,再调用sendMessageDelayed来发送消息,这个函数可设置多长时间后再发送,在其内部又调用sendMessageAtTime来发送。public boolean sendMessageAtTime(Message msg, long uptimeMillis) { MessageQueue queue = mQueue; if (queue == null) { RuntimeException e = new RuntimeException(this + " sendMessageAtTime() called with no mQueue"); Log.w("Looper", e.getMessage(), e); return false } msg.target = this; return enqueueMessage(queue,msg,uptimeMillis);//将message传入MessageQueue }这样就将一条由Runnable组成的Message通过Handler成功传入MessageQueue。


